 Here's a shot of the first corner of the dining room with the finished plate rail and wainscotting. I must say I'm really pleased with the results.
Sunday, April 27, 2008
A Taste of Things to Come
Here's a shot of the first corner of the dining room with the finished plate rail and wainscotting. I must say I'm really pleased with the results.Wednesday, April 23, 2008
Dining Room Trim Profiles
Those of us lucky enough to live in Portland have two excellent local suppliers of traditional millwork. I used McCoy Millwork for all of my kitchen trim and Rejuvenation for all of the dining room trim. Sorry to say Rejuvenation can't ship any of its millwork, but McCoy will gladly ship anything anywhere.
 This is a mockup of the plate rail I am installing in the dining room.
I kept the original baseboards (5/8" x 7-1/2") and ran the panel battens vertically between the bottom of the built-up plate rail and the baseboards. I removed the original base cap and used the #1723 panel stops to frame each panel section.
 This is a mockup of the plate rail I am installing in the dining room.
 I kept the original baseboards (5/8" x 7-1/2") and ran the panel battens vertically between the bottom of the built-up plate rail and the baseboards. I removed the original base cap and used the #1723 panel stops to frame each panel section.
The sizes and item numbers (per the Rejuvenation catalog) are as follows:
1-1/2" x 3" Plate Rail - 4497
3/4" x 5-1/2" Flat Casing- 7721
5/8" x 2-1/2" Panel Batten - 9871
3/8" x 1/2" Panel Stop - 1723
1-1/2" x 3" Plate Rail - 4497
3/4" x 5-1/2" Flat Casing- 7721
5/8" x 2-1/2" Panel Batten - 9871
3/8" x 1/2" Panel Stop - 1723
Thursday, April 17, 2008
Plate Rail Installed
 Most of the wood is up in the first corner. The only thing left is the beading on the right panel and then finish priming and painting.
 A little more detail.
 I love it when the pieces line up with the layout marks!
Tuesday, April 15, 2008
No Heat = Motivation
 I decided to start putting up the new moulding in the corner of the dining room that has the thermostat. Since the thermostat will be mounted on the new board, I had to unhook it in order to mount the trim. That was last night. Laziness got the better of me and I left the thermostat unhooked because I didn't want to go through the hassle of connecting all the wires only to unhook them again the next day. When I got home from work today it was 61 degrees in the house! I quickly set to work to get the trim mounted in that part of the room so I could get the heat going again. I learned the hard way that you should cut the power to your furnace when you unhook the thermostat. Some of the bare wires shorted and blew the fuse on my furnace control board. Luckily the auto parts store 2 blocks away had the replacement 3A fuse.
Anyway, here's what the trim looks like so far. I still need to mount the plate rail on top and the beading around each "panel".
 I couldn't really get a good picture of this, but I wanted to show how I handled the junction of the new moulding with the old. The door casing is the same thickness as the new board, but the casing has rounded edges so the two do not meet flush. Filling the gap with wood filler would probably crack fairly soon, so I decided to go the opposite route and accentuate the joint instead of trying to hide it. I simply put a 45 degree chamfer on the end of the new board. Once everything is caulked and painted it will look nice.
Saturday, April 12, 2008
The Joy of Painting
Ahhh, "The Joy of Painting". That reminds me of another place, another time: summers in college spent sitting on the couch watching PBS while the late, great Bob Ross taught and inspired us. I miss that guy. Never before or since has there been any one quite like him.
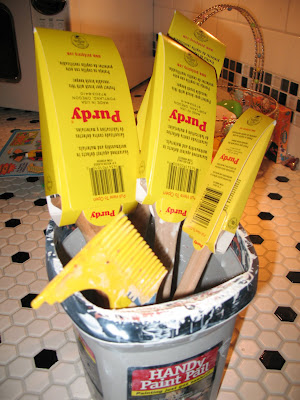
 Get yourself some good quality brushes. I am hooked on Purdy
  brushes (made right here in Portland). These cost between $4 and $18 each, but they are worth every penny. I can count the number of lost bristles from all 4 of these brushes on one hand. The handles are very comfortable, and they wash up nicely. Speaking of washing up, be sure to get a brush comb if you don't already have one. It makes washing brushes a breeze. The fat 2.5" brush takes about 90 seconds to clean with running water and a brush comb.
 The HANDy Pail and the Paint-n-Pour gallon lid are two of my favorite accessories. The pail has an adjustable strap that works great, and a magnet to hold your brush out of the paint. It also has disposable inserts available, but I just wash mine out each time I use it.
The Paint-n-Pour lid is great because you can unscrew the cap and pour paint without making a mess all over the front of the can. It also has a lid that opens so you can use a brush with the can. It fits well enough that I leave it on a can for several days without any dried out paint forming on the inside.
 I have been using Devine trim paint which is luxuriously thick and rich, but a little too thick to get good results with a brush. I thin it a little with Floetrol
  and it goes on like butter (or yogurt, as the can says).
But I digress. I wanted to talk about how much fun painting can be with the right tools. Before I started working on this house the only thing I ever painted were the walls in new houses using a roller. That is certainly satisfying, but trim painting (with a brush) is way more rewarding! Here are a few of my favorite items that I have discovered since starting on this little journey.
 Get yourself some good quality brushes. I am hooked on Purdy
  The HANDy Pail and the Paint-n-Pour gallon lid are two of my favorite accessories. The pail has an adjustable strap that works great, and a magnet to hold your brush out of the paint. It also has disposable inserts available, but I just wash mine out each time I use it.
The Paint-n-Pour lid is great because you can unscrew the cap and pour paint without making a mess all over the front of the can. It also has a lid that opens so you can use a brush with the can. It fits well enough that I leave it on a can for several days without any dried out paint forming on the inside.
 I have been using Devine trim paint which is luxuriously thick and rich, but a little too thick to get good results with a brush. I thin it a little with Floetrol
Finally, a word about prep. Make sure to take the time to properly prep your walls and trim. I have found that painting the walls with a roller only requires one coat if I'm painting on top of primer. Two are needed if painting on top of old paint. It may sound like "six of one; half dozen of the other" but remember, primer is cheaper, it dries faster, and the top layer sticks to it better.
One more word about primer. I've been priming and painting a lot of bare wood lately and I find it works best to sand the wood first, then apply a thin coat of primer. When the first coat of primer is dry go back over and do a second coat right away. Then sand the primer with a fine grit sandpaper. I usually do this before I cut any of the trim. I do my measuring and cutting on the primed wood and then sometimes I'll do a first topcoat before installing it and then do a final finish coat post-installation. Other times I'll do one or two finish coats after it's all installed. It all depends on how much cutting and handling I'll be doing with the wood.
I hope you found this useful. Now go get to work!
I have the Devine "Blush" on the walls. I like the color, but I love the Devine paint. With a properly primed wall it gives complete coverage in one coat. I need to touch-up the picture rail around the top of the room because the painter's tape pulled off some of the paint. Then it's on to getting the moulding primed and installed.
Click on the pictures below to see the bigger ones.


Click on the pictures below to see the bigger ones.


Wednesday, April 9, 2008
Bistro Train Rack Installed
 I was going to finish taping the dining room tonight so I could start painting tomorrow, but I had our beautiful new train rack from Restoration Hardware sitting in the way so I had to move it. Instead of moving it from one place to another and risk dropping something on it while working in the dining room, I decided to go ahead and install it!! What a concept!
I fell in love with this thing the very instant I first saw it two years ago. I'm glad to finally have it on my wall. Now if I could just get rid of that ugly wallpaper...
Friday, April 4, 2008
Dining Room Progress
 I did my best to keep the dust contained in the dining room while we sanded the topcoat. Let me just say... sanding joint compound in a living area is NOT a good idea. Unfortunately we didn't have much choice.
 Done sanding and ready to be thoroughly cleaned and primed.
 The dried joint compound is amazingly close in color to the beige on two of the already finished dining room walls.
Subscribe to:
Posts (Atom)
Subscribe |
Portland HouseblogsBlogs I Like
About Me |


