Frank Lloyd Wright Quote

"Form follows function-that has been misunderstood. Form and function should be one, joined in a spiritual union"

Frank Lloyd Wright

Tuesday, June 26, 2007

Cabinet Glass: Check!

And one more thing gets crossed off the list.

The good people at Cline Glass got us setup with some "seedy" glass for our new cabinets. They have literally hundreds of types of glass to choose from. I just gave them my measurements and they had the cut pieces ready by the end of the day. They also happen to be located directly across the street from Rejuvenation House Parts. Ya' can't beat that!

The cabinets came "prepped for glass", meaning the doors were rabbeted for the glass and retaining clips were provided. The retaining clips didn't quite touch the glass that I chose (thicker glass would have been fine), so to keep the glass from rattling I ran a bead of clear silicone around the perimeter before securing with the clips.

Add Glass to your Kitchen Cabinets

Sunday, June 24, 2007

Cabinet Hardware is installed

Choosing the cabinet knobs and drawer pulls was the most difficult decision we made in this whole poject. It was tough finding something that tied together the original bungalow style with the modern elements in the kitchen. We ultimately decided on Belwith-Keeler's Bungalow Satin collection.

The knobs are the 1-3/4" long, P2151-SN,and the pulls are drilled for both 3" and 96mm centers, P2153-SN.Many of the online cabinet hardware stores carry Belwith-Keeler, but I picked mine up at my local Lowes for about the same price as the online stores charge after shipping and handling.
The hardware is of good quality and has properly finshed surfaces not only on the outer faces for appearance, but on the inner faces for comfort while you are pulling on them. The rectangular knobs even have two little points cast into them that grab the wood to prevent the installed knob from turning. This is a big help since the rectangular shape of the knobs really accentuates any misalignment.

Thursday, June 14, 2007

I Found a Treasure Map!

It's good to know that whoever remodeled this house some 25 years ago had a good sense of humor. Checkout the messages I found behind the wallpaper.


This one says: "The money is hidden behind the third row of bricks in the north wall of the fireplace."

Right next to that was the following latin text: "Ad tempus homo est nihil pindar 81 AD" Anyone speak latin?

Kitchen: The Rebirth

Well, I finally made it over the hump! All of the old stuff is gone and most of the major new things are in or on the way.

You can see that my youngest daughter is quite happy to have a kitchen again! The new Medallion cabinets are installed as well as the hex tile countertops and subway tile backsplash. We chose the Medallion Sonoma cabinets in cherry, with the Chestnut finish. I even got to practice my finish carpentry skills by making a new window stool.

This is a view of what used to be the original utility chimney and a ratty old pantry with a heating duct running through it. I removed both, pushed the wall back 18" and added L-shaped cabinets and counters. I now have 2 ducts running through the new wall up to the top floor.

The refrigerator is a Big Chill unit that we absolutely love!


This is the main view into the kitchen from the dining room. It's getting pretty close to done, but I still need to install the new door and window casings and finish the crown moulding. All of the trim will be painted white. The cheapo electric range will be replaced with a vintage O'Keefe & Merritt 36" range. The range hood is a Vent-a-Hood 9" high Excalibur model.


New Wall for Cabinets

I decided to remove the old utility chimney that came up from the basement all the way through the roof. This not only gave us extra floor space on 3 levels, but it gave me a great excuse to get a new 95% efficient gas furnace.

This shows where the old wall was. The plywood on the left is covering the hole left by the chimney. The space on the right was a built-in pantry that had an asbestos-lined heating duct running through it. Hot asbestos does not go well with Wheaties.

The new wall was pushed back 18" and now contains two ducts running upstairs.


I also added outlets for countertop recepticles and under/over cabinet lighting.


Two ducts run upstairs and one turns out and runs under the cabinets. I used a bag of level-quick to bring the floor up to level with the original subfloor.

Wednesday, June 13, 2007

Kitchen Demolition

I managed to put off the real demo work for as long as possible so the kitchen would stay completely functional most of the time. It turned out to be 2 weeks of mayhem, with only 1 week without a kitchen sink. (you have no idea just how often you use your kitchen sink until it's gone!)


This is what the kitchen looked like in the middle of the tear-out.


Here you see the lovely pink and green two-tone that must have been the original wall colors, as well as the most recent country-style wall paper.


Not much left here. The dishwasher is one of the few things staying.

We've actually turned the corner in this pic. The ceiling is painted its final color: Devine "Icing", the walls have a skim coat of plaster and their final color (at least the parts that won't be behind cabinets or backsplash): Devine "Butter" and I've installed the nailers for the crown moulding.

Kitchen: The Plan

We went back and forth several times trying to decide just how extensive of a remodel we should do on the kitchen. At first it was paint the cabinets, tile over the masonite, and put down a new floor on top of the old one. But for just a few extra bucks you could... You know the story.

Here's what we ended up with:
  • All new cabinets
  • Hex tile countertops
  • Subway tile backsplash with a strip of mosaic glass squares (my wife's favorite)
  • New "Big Chill" retro refrigerator
  • New sink (with a garbage disposal!!!)
  • New faucet & plumbing - no more galvanized plumbing going to the kitchen, yipee!
  • New floor - Marmoleum click-tiles on original subfloor; only had to remove 3 layers of old flooring.
  • New (old) vintage stove - 1940's O'Keefe & Merritt
  • New Vent-a-Hood 9" Excalibur range hood
  • Removed old utility chimney
  • Removed dumpy old pantry
  • Added new GFCI recepticles around countertops; two outlets in a kitchen will NOT cut it!
  • Under and over-cabinet lighting
  • New lights over the sink
  • Replace ceiling fan with vintage Schoolhouse Lighting fixture
  • All new door and window trim

Kitchen: The Inspiration

I won't bore you with all of the details that went into shaping our final kitchen plan, but I will say that in the end it came down to one picture from the Rejuvenation House Parts catalog. Their "Period Basics" kitchen is a great example of classic styling that has maintained its appeal through the years.

The key elements we brought into our kitchen are the hex tile counters bordered with black trim, wood cabinets (vs. white painted), schoolhouse style lighting, and the subway tile backsplash.

Our Design Philosophy

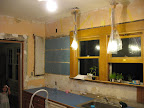
So we spent all this money on an old house with "good bones" that is just oozing character. Then why is it so damn ugly? I'll tell you why: Because every single thing in this house is BLUE, that's why! Blue siding, blue countertops, blue bathroom, three types of blue wallpaper! It even has a humongous blue hydrangea in the front yard. Not only did the previous decorator have a thing for blue, but everything was done in a country motif. Ugh.

Anyway, aside from the questionable decorative tastes of the previous owner, and the shoddy trimwork done by said owner, this is a great house. It was literally the only one we looked at that met ALL of the criteria we had on our list. The process of buying it was a total nightmare, but that's another story...

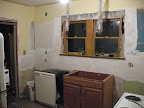
Back to design philosophy. As my wife and I go through this house room-by-room to bring it into the 21st century, we are making sure the choices we make will not only stand the test of time, but work well with the style of the house. I don't know if there's a name for our approach, but I like to call it "Respectful Remodeling". That means we'll make choices like subway and hex tile in the kitchen without getting hung up on things like glazed vs. unglazed and "flat" vs. "pillowed" tiles. Brand new lighting fixtures are going in throughout, but they will all fit-in with the house. Our plan is that an average Joe off the street might think everything is original to the house. Only a remodeling geek should be able to catch the "modernisms".

And so we embark... The entry, living and dining will just get paint for now. The kitchen will be the first big project. So have a look around this blog and check back often.

Welcome to my blog!

I finally got around to setting up a blog for our house remodel. I've got some progress pictures to post of the kitchen which will be up here soon.