Frank Lloyd Wright Quote

"Form follows function-that has been misunderstood. Form and function should be one, joined in a spiritual union"

Frank Lloyd Wright

Friday, December 26, 2008

My Wife Gave Me the Bird

Isn't it cute?

It's a bird sculpture made out of wire and sunglasses by Terry Border. I've been following his blog, Bent Objects for a while now and I finally got to purchase a piece from his Etsy shop for a Christmas present. He takes ordinary objects and gives them personality using little more than his slightly warped sense of humor and a little bent wire. I love it!


And now for something completely different.... Here's an advertisement:
Hotel Furniture
Hill Cross specialise in providing high quality hotel furniture.

Monday, December 22, 2008

Craigslist To The Rescue

If you've been following this blog you already know we got a LOT of snow in Portland this week (over a foot so far). Normally in Portland if you ignore the snow long enough it will just go away. That's what I've been hoping for all week, but to no avail. We got another 5" overnight with more on the way. With time quickly running out to finish the Christmas shopping, I figured I had better give-in and get some chains for the car so I can get out on the roads. Of course by now every auto parts store in the area is out of chains that fit my car. As a last-ditch effort I resorted to craigslist. To my surprise I found a guy fairly close to me who offered to deliver the chains to my door! On top of that he was asking far less than the retail price of the chains. His name is Jose Mesa and he's an auto wholesaler here in Portland. I figured since he helped me out I'd post a link to his website: www.josemesa.com I've never bought a car from him but he seems like a good guy so look him up if you're looking for a car.

Six Degrees of Renovation

Pardon the geek-speak, but I want to talk about something I call "cascading dependencies". When renovating an old house you are bound to spend countless hours pondering all the things that need to be done, and in what order to do them so you can prevent re-work or avoid painting yourself into a corner (so to speak). It's kinda like playing Six Degrees of Kevin Bacon, only a whole lot more expensive. In everyday life you analyze dependencies without thinking about it, but when it comes to remodeling projects it takes on a whole new dimension. For example, if you said to your spouse "I need to put on my socks before my shoes", you might get a strange look for stating the obvious. But if you say something like "We can't remodel the kitchen until we get a new furnace" or "You can't park the car in the garage until we get a new fence and electrical panel" you're bound to find out that what is obvious to you isn't so obvious to everyone else.

Here's a shorthand notation depicting my actual kitchen/furnace and parking/main panel issues:

Remodel Kitchen
> Put in new corner cabinets
>> Remove old utility chimney

>>> Move furnace so it vents out basement wall
>>>> Buy new 95% efficient furnace (can't vent through wall with old 80% units)


Park in Garage
> Install garage door opener
>> Run electricity to garage
>>> Dig up old fence and run conduit underneath
>>>> Replace main panel so it can handle new 50A circuit

Of course cascading dependencies exist in all areas of life, but most people aren't geeky enough to post about it on their blog. For example, you might hear your wife say something like this: "Thanks for the lovely platinum necklace. Of course I can't wear it with my gold earrings; I'll need a new platinum pair to match." Or perhaps "This new HDTV is awesome! Now we need to buy a Blu-Ray player."

Now let's have some fun with this. Post your favorite not-so-obvious chain of dependencies in the comments below.

Sunday, December 21, 2008

The Morning After

Sometime early this morning the blowing snow changed to freezing raing. Now we have about 1/8" of ice on EVERYTHING. Unfortunately I couldn't get the car up the driveway yesterday and now it's parked directly under that big maple tree that is covered with ice and losing branches. I guess I should go move it somewhere, but I'm afraid it won't budge.

Saturday, December 20, 2008

Portland's Version of a Blizzard

I stepped out onto the front porch before the light was gone and shot a quick video of our street. I haven't seen a storm like this since I left Minnesota as a kid. I know that's not saying much since I spent most of those years in places like Texas and Arizona, but still, it's quite miserable out there tonight. We've had snow on the ground continuously for a week now. That hasn't happened in Portland since I've lived here. The schools were closed on Monday, Wednesday and Friday, but open on Tuesday and Thursday. That made for an "interesting" work week. The worst part is that I've been trying to finish my Christmas shopping (and shipping) all week but the weather is making that very difficult.

The hummingbird feeder has been busy this week. I don't see how those little guys can survive in the cold weather. I've been bringing the feeder in to let it thaw twice a day and they seem to appreciate it!

Riley says "NO THANK YOU!!" I don't blame him. I wouldn't want to run around out there in my bare feet either.

Friday, December 19, 2008

Website Remodel is Done

I've been working on redesigning this website during my FTO this week (Forced Time Off). I decided that the old look and feel was getting, well, old. I changed the blog template and took advantage of some new features. I hope you enjoy!

Wednesday, December 17, 2008

Snow Daze

'Tis the Season, and everybody has been posting pictures of their fabulous holiday decorations. We've even seen pics of Portland's snow this week. Well here's the less glamorous, more realistic vision of the second Snow Day this week (so far), as seen by anyone who is brave enough to enter the 1916 Portland Bungalow.


In this picture you see my camera shy 7-year old, all the crap that comes from being cooped-up for 2 days, and proof that I still haven't finished the dining room wainscotting. If we get any more snow days this week somebody better send me a dump truck. And a straight-jacket.

Sunday, November 30, 2008

Pepto Dismal

I started demolishing the "Joe vs. the Volcano" room over the Thanksgiving weekend. The whole room was covered in a 1/8" layer of drywall that thinly veiled what can only be described as a Pepto Bismol Chamber of Horrors!!!

All four walls were painted this awful (but not quite hellish) hue of pink. The ceiling was obviously insulated, but not drywalled in its previous incarnation.


The flourescent pink, orange, and yellow paint (and the ceiling mounted mirror!!!) must have been pretty f'ing trippy while getting bombed and listening to Iron Butterfly sometime in the 70's.


Here's a shot showing the wall that I'm removing to make two rooms into one big room. This new big room will the the family room/movie theater/homework room.

Sunday, November 2, 2008

I'm Published (sort of)

If you have a copy of the December 2008 issue of Old House Journal, and a keen eye, you might notice a couple pictures from this site made it into print. The first one is in the article about "The Inherited Garden", albeit with a photoshopped sky. The other one is in the article about weatherstripping (the window on the right page).


Saturday, October 25, 2008

The Seedy Underbelly

My winter project is going to be to get the basement completely gutted. As you can see from the pictures below I've got quite a bit of work to do. I need to go through 7 years worth of kid's stuff and see what needs to be saved, what needs to be sold at a yard sale, and what needs to be trashed. Only then can I continue tearing apart the old finished areas. My goal is to have a completely empty basement to serve as a blank slate.


The door at the top of the stairs will eventually be removed. I'm going to put in a couple winder stairs coming down from the main level so I can move the stairs back a foot or so for better head clearance at the bottom.


This used to be a guest room. It was probably the most "finished" room in the basement, although for some reason it reminds me of the office from "Joe Vs. the Volcano".


Another view of the old guest room. The closet is against the east wall of the basement. The wall on the left will be removed to open up this space so we can use it as the family room. Current plans call for an "Old Hollywood" theme and a large flat panel TV on the wall.


This is the tiny, decrepit old bathroom circa 1980. Everything will be removed, the footprint will be slightly enlarged, and the new bathroom will be consistent with the work we have done on the main floor.


This is our current laundry room. It will remain a laundry room, but it will be properly finished with some built-in cabinets and ironing board. (How many code violations can you count!?)


The boxy room on the right is the bathroom. The room on the left will become the new guest room. I'll have to put in an egress window and a closet, but it will end up being a good sized guest room (about 10'x12')


Finally, our tour takes us to what will the the other half of the family room. The wall to the right is the one that separates this space from the "Joe vs. the Volcano" office. You can just see the edge of the bathroom on the left.


The plan is to first gut the entire basement, then put in new PEX plumbing and run CAT6 cable everywhere while everything is accessible. I'll figure out the rest at that point.

Sunday, October 12, 2008

New Hardware for Sideboard

My mom got me a gift certificate to Rejuvenation for my birthday. (Thanks Mom!) Today I finally figured out what to spend it on. I got some new knobs for the sideboard to replace the Queen Anne teardrops that were on it. I went with the Mission Pyramid knob in oil-rubbed bronze. The shape echoes the knobs in the kitchen without being to "matchy-matchy". I like the way the black is offset against the white. I still need to replace the hinges with some original style ball tip hinges, but that will be quite a bit of work so I'll save it until I refinish the whole sideboard

Sunday, October 5, 2008

Quick Tip: Skewer Your Caulk

Ummmm, yeah....


I like to use a bamboo skewer from the kitchen to puncture the inner foil seal on new tubes of caulking. Then when I'm done, I use it to seal the tube. I find it works better than the little cap that sometimes comes with the caulk.

Saturday, October 4, 2008

Giving Props to the Garage


If you read my last post you might have asked yourself "Where did all that crap come from?". Well, about 1/3 of it came from the garage. The other 2/3 came from the basement demo that I started 2 years ago. Here's a shot of the garage interior. Notice the different colored ceiling joists? If you look closely you can see the white ones are sistered with the other ones, but none of them run the full width of the garage. It was always a mystery to me until one day I was looking down at the floor, which was only visible because most of the crap was now in the dumpster! It turns out my garage has had 2 additions. I always knew it was expanded in depth, but I finally put 2 & 2 together and figured out it was also widened at one point. They didn't bother to put in new full-width joists, instead opting to cut the original joists in half, spreading them apart and using a few nails to sister the white boards to the old ones. Needless to day, after time they started to sag.


Solution: Jack up the sagging joists, drill holes all the way through, and bolt them together. It's not as elegant as actually having full-width boards, but it will have to do.

Sunday, September 28, 2008

How I Spent My Summer Vacation

I know I've been absent for quite a while, but I promise you haven't missed anything. Back in June I told myself I'd get loads of work done on the house this summer, but it was not to be. I had too much fun on vacation, and then when I got back I had to go all-out to get a massive systems upgrade done at work. Well, we "went live" this weekend so now work is off my back for a while.

Here's a quick photo journal of what I did this summer.

Sorry for the blurry photo, but this is one of the few house-related tasks I got done. I filled this dumpster (by myself!) with crap from the garage and basement. Unfortunately, I've got enough stuff left over to fill another one or two.


After I got the dumpster filled, I got to spend a week on a boat. A really BIG boat! Here we are anchored in Jamaica. Yeah Mon!


And here we are anchored at the local beach bar. (I'm the one enjoying a nice "domestic" beer and a jerk chicken sandwich. Yummmmmm.)


While in port at the Cayman Islands, we were captured by pirates. The kids were forced to swab the decks.


And take the Pirate Oath.


We managed to free ourselves from those scurvy-dogs and get back onboard the Conquest where we gorged ourselves on copious quantities of mediocre buffet fare for the next 2 days. Finally we docked in Galveston and the fun was over. Back to the grind.

Sunday, June 1, 2008

100% Done with 50% of the Dining Room


I put the finishing touches on the paneling on the North wall of the dining room this weekend. Overall, I'm very happy with the results. One thing I will do differently in the future is to not use a roller to put on the primer if I'll be using a brush for the final coat. It took a few thick coats on the recessed parts of the wall to get good even results.


I need to either get a better camera or learn how to use mine better, because these pictures are way too grainy and the red color doesn't look anything like it does in person.

Wednesday, May 28, 2008

Looking at Exterior Colors, Part 1

The paint on our exterior is starting to fail in a lot of places, so we are starting to look for a painting contractor. I had Sam Sundeleaf out the other day from Sundeleaf Painting to give me a bid for a high-quality "investment grade" paint job. He spent a lot of time talking to me to figure out exactly what I wanted and to explain the kind of work they do. I was very impressed. Then I got his bid and realized that I ain't gonna be gettin' no "investment grade" paint job!

This weekend we were over at Grant Park with the kids and I saw some guys just finishing the exterior of this house:


I fell in love immediately! I never knew black accents could look so good. Not only are the colors nice, but you can tell within 3 seconds of looking at the house from the street that the prep and paint are well-done. I got the business card for the paint removal and paint companies and I'll have them out for some bids soon.

If you are looking to paint the exterior of your bungalow and need help choosing colors, you might give one of these books a try:

Monday, May 19, 2008

Things are Blooming

We have a huge lilac that just came into full bloom. I love having the upstairs windows open this time of year because the sweet smell of lilac wafts through the whole upstairs.


Right now the rose garden on the south side of the house looks kinda sad, but when I get it weeded and the roses bloom in a few weeks it will be very nice!

Sunday, May 18, 2008

Bungalow For Sale

No, not mine, the one across the street.


It was on the market for 9 days with an asking price of $419k. It used to be a rental but it got a full renovation (and a nice one at that!) and will soon be home to a new family on the block. It's nice to know that in the current real estate market my neighborhood can still do well!

Friday, May 16, 2008

If I Ever Write a Book...

...It will be titled "How to Remodel Your House 10 Minutes at a Time". It's been a long, slow, steady process but I finally got all the trim up on the second corner of the dining room. I literally didn't spend more than 30 minutes in any one day on this. Now all that's left is some priming, the finish coats, and touch-up. Oh yeah, and then the other two corners of the dining room, and restoring all of the windows in the dining room. Now that we've hit 90 degrees I'll be highly motivated to get those windows un-stuck.

Sunday, April 27, 2008

A Taste of Things to Come

Here's a shot of the first corner of the dining room with the finished plate rail and wainscotting. I must say I'm really pleased with the results.

Wednesday, April 23, 2008

Dining Room Trim Profiles

Those of us lucky enough to live in Portland have two excellent local suppliers of traditional millwork. I used McCoy Millwork for all of my kitchen trim and Rejuvenation for all of the dining room trim. Sorry to say Rejuvenation can't ship any of its millwork, but McCoy will gladly ship anything anywhere.

This is a mockup of the plate rail I am installing in the dining room.

I kept the original baseboards (5/8" x 7-1/2") and ran the panel battens vertically between the bottom of the built-up plate rail and the baseboards. I removed the original base cap and used the #1723 panel stops to frame each panel section.


The sizes and item numbers (per the Rejuvenation catalog) are as follows:

1-1/2" x 3" Plate Rail - 4497
3/4" x 5-1/2" Flat Casing- 7721
5/8" x 2-1/2" Panel Batten - 9871
3/8" x 1/2" Panel Stop - 1723

Thursday, April 17, 2008

Plate Rail Installed

Most of the wood is up in the first corner. The only thing left is the beading on the right panel and then finish priming and painting.


A little more detail.


I love it when the pieces line up with the layout marks!

Tuesday, April 15, 2008

No Heat = Motivation

I decided to start putting up the new moulding in the corner of the dining room that has the thermostat. Since the thermostat will be mounted on the new board, I had to unhook it in order to mount the trim. That was last night. Laziness got the better of me and I left the thermostat unhooked because I didn't want to go through the hassle of connecting all the wires only to unhook them again the next day. When I got home from work today it was 61 degrees in the house! I quickly set to work to get the trim mounted in that part of the room so I could get the heat going again. I learned the hard way that you should cut the power to your furnace when you unhook the thermostat. Some of the bare wires shorted and blew the fuse on my furnace control board. Luckily the auto parts store 2 blocks away had the replacement 3A fuse.

Anyway, here's what the trim looks like so far. I still need to mount the plate rail on top and the beading around each "panel".


I couldn't really get a good picture of this, but I wanted to show how I handled the junction of the new moulding with the old. The door casing is the same thickness as the new board, but the casing has rounded edges so the two do not meet flush. Filling the gap with wood filler would probably crack fairly soon, so I decided to go the opposite route and accentuate the joint instead of trying to hide it. I simply put a 45 degree chamfer on the end of the new board. Once everything is caulked and painted it will look nice.

Message to the Future


I left a note for the future.

Saturday, April 12, 2008

The Joy of Painting

Ahhh, "The Joy of Painting". That reminds me of another place, another time: summers in college spent sitting on the couch watching PBS while the late, great Bob Ross taught and inspired us. I miss that guy. Never before or since has there been any one quite like him.


But I digress. I wanted to talk about how much fun painting can be with the right tools. Before I started working on this house the only thing I ever painted were the walls in new houses using a roller. That is certainly satisfying, but trim painting (with a brush) is way more rewarding! Here are a few of my favorite items that I have discovered since starting on this little journey.

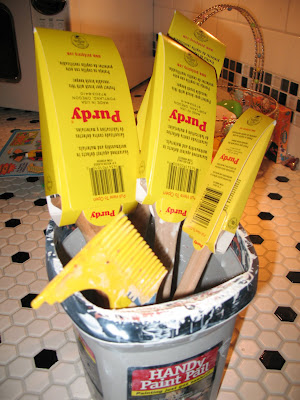
Get yourself some good quality brushes. I am hooked on Purdy brushes (made right here in Portland). These cost between $4 and $18 each, but they are worth every penny. I can count the number of lost bristles from all 4 of these brushes on one hand. The handles are very comfortable, and they wash up nicely. Speaking of washing up, be sure to get a brush comb if you don't already have one. It makes washing brushes a breeze. The fat 2.5" brush takes about 90 seconds to clean with running water and a brush comb.

The HANDy Pail and the Paint-n-Pour gallon lid are two of my favorite accessories. The pail has an adjustable strap that works great, and a magnet to hold your brush out of the paint. It also has disposable inserts available, but I just wash mine out each time I use it.
The Paint-n-Pour lid is great because you can unscrew the cap and pour paint without making a mess all over the front of the can. It also has a lid that opens so you can use a brush with the can. It fits well enough that I leave it on a can for several days without any dried out paint forming on the inside.

I have been using Devine trim paint which is luxuriously thick and rich, but a little too thick to get good results with a brush. I thin it a little with Floetrol and it goes on like butter (or yogurt, as the can says).

Finally, a word about prep. Make sure to take the time to properly prep your walls and trim. I have found that painting the walls with a roller only requires one coat if I'm painting on top of primer. Two are needed if painting on top of old paint. It may sound like "six of one; half dozen of the other" but remember, primer is cheaper, it dries faster, and the top layer sticks to it better.

One more word about primer. I've been priming and painting a lot of bare wood lately and I find it works best to sand the wood first, then apply a thin coat of primer. When the first coat of primer is dry go back over and do a second coat right away. Then sand the primer with a fine grit sandpaper. I usually do this before I cut any of the trim. I do my measuring and cutting on the primed wood and then sometimes I'll do a first topcoat before installing it and then do a final finish coat post-installation. Other times I'll do one or two finish coats after it's all installed. It all depends on how much cutting and handling I'll be doing with the wood.

I hope you found this useful. Now go get to work!